Showing posts with label Noodle/Rice/One Dish Meal. Show all posts

Monday, 14 July 2025

Shakshuka

I wanted to cook this for the longest time since I am leaving for a short break and need to clear the tomatoes, so it's perfect timing for Shakshuka.


Findings: So easy and yet so flavourful.  Totally love it.

What you need:
Serve 3

1 medium onion, diced
1 Bell pepper, seeded and diced
4 cloves garlic, finely chopped
1 can peeled tomatoes or 6 fresh tomatoes

2 tsp paprika powder
1 tsp cumin powder
¼ tsp chilli powder

4 eggs
Salt and pepper to taste
Chopped cilantro and parsley

Method:

Saute the diced onion and bell pepper with a little olive oil over medium heat (about 5 mins).

Add in garlic and spices and stir until fragrant.

Add in the tomatoes and once it starts to lightly simmer.

Spread the mixture evenly and make 6 holes  

Place the egg gently into each hole.  Reduce the heat to low and cook for 8 mins or until eggs are done to your liking.

Season the eggs with salt and pepper.

Garnish with fresh herbs.


Enjoy!

Thursday, 16 January 2025

Ravioli with tomato sauce

A friend left behind 2 packets of frozen Ravioli so I got her blessing instead.  

Let's have Ravioli with tomato sauce.


Learning: The frozen ravioli took longer than expected to soften.  So please adjust timing.

Son did not like the tomato base sauce so for the next pack, I will do cream based.  Hub and I finds it yummy though.

What you need:

500g frozen ravioli
2 cans of tomatoes
1 onion, diced
2 tbsp minced garlic
Basil leaves, chopped finely
½ tsp oregano
½ cup chicken broth
½ cup whipping cream
Season with salt and pepper
Olive oil

Lots of spinach

Method:

Blitz the can tomatoes.  

In a pot, add olive oil and sauté the onion and garlic until fragrant.

Add in the tomatoes, chicken broth and season with basil, oregano, salt and pepper.

Add in ravioli and bring to a boil and let it simmer for 15 mins.

Add whipping cream and spinach. Mix well until spinach is cooked.

Garnish with parmesan cheese.

Enjoy!

Monday, 4 November 2024

Baked Rice

Son loves Baked Rice and I am introducing another way of cooking it so that in the future, both kids will enjoy as a variation that son only knows one. 


What you need:

Bolognese sauce

200g minced beef
200g minced pork
½ onion, finely chopped
1 clove garlic, minced
90g carrot, finely diced
400g canned whole tomatoes
15g tomato paste
100ml red wine
120ml water
1 tbsp dried oregano
1 sliced bay leaf
Salt and pepper to taste

White sauce

28g butter
28g plain flour
400ml milk
A pinch of salt
Pepper 

Tumeric rice

1 cup rice
¼ tsp turmeric powder
1 cup water


60g Gruyere cheese

Method:

Rinse rice well, add turmeric powder and water, stir and cook as normal.

Puree the canned tomato until smooth.

Heat oil in a pan, add in onion and carrot.  Sautee and cover and let it cook until soft.

Add minced garlic and minced meat and cook until lightly browned.

Pour red wine and stir well.  

Add in tomato puree, tomato paste, oregano and bay leaf.  Season with salt and pepper.

Add water and mix well.  Reduce heat to low and let it simmer uncovered for 30 – 40 mins.  


White sauce

Melt the butter in a pan, add flour and whisk until bubbles formed.

Add cold milk slowly while whisking and on low heat stir until it thickens.

Season with salt and pepper.


Assembly

Spread a layer of turmeric rice in the carrole. 

Pour a layer of white sauce evenly.

Add the Bolognese sauce in the middle and sprinkle with cheese on top, spread evenly.

Preheat oven to 220℃ and bake for 15 -18 mins or until top is golden brown.

Serve hot.

Enjoy!

Thursday, 31 October 2024

Fried Hokkien Mee 炒福建面

I can’t recall whether I documented Fried Hokkien Mee 炒福建面 in this blog but since I am craving for a plate.  I shall post it here again in case my baby wants to cook.

Am happy that I have achieved the right noddle texture as well as the taste.

What you need is a good stock base which consists of prawns and pork broth.  I did not add squid as the traditional ingredient as the family is not a fan.


What you need:

1 kg prawns (deshelled and deveined) (keep head and shell for stock) 
1 fish cake (sliced thin) - I opted for this because my family don't take squids (optional)
½ kg pork belly (I opted for lean meat), cooked in the broth, sliced thinly
Spring Onion or Ku cai 
Bee Hoon 
Yellow Noodle 
Minced garlic 

Broth (season with salt, fish sauce and pepper)
1 kg of prawn heads and shell 
1 bulb of garlic 
fish sauce 
Water 

Method:

Boil the prawn head, pork bone and pork for an hour or more.  Add in the pork belly and cook until the meat is soft.  Sliced the pork belly into strips.  

Heat up the wok on high heat with oil.

Sautee the garlic until fragrant, and add in the yellow noodles and bee hoon.  Sautee until the garlic is well mixed into the noodles.

Add in the broth ladle by ladle.  Cook until noodles are soft.  

Add in the sliced fish cake, prawns, pork belly and squid.   Add more stock and continue to cook until the prawns and squid are cooked.

Stir in the chives and serve with a good sambal.


Enjoy!

Thursday, 19 September 2024

Fried Dace Fish Bee Hoon

We like fried trotter leg bee hoon and have had them numerous times.  Unfortunately, these days, the can hardly has any meat in it and it consists of just fats and skin plus the insane pricing for this can of food, it was a turned-off and I am staying clear even though we like it.

Spotted my friend using Dace fish with salted black bean to fry her bee hoon and she said it is even better than the Fried Trotter bee hoon so I decided to try it.


Findings: This dish tasted really delicious.  Though does not have the same fragrance as the Fried Trotter Bee Hoon, I think this is a good substitute.

Thanks AS for sharing.

What you need:

1 can of Fried Dace Fish with salted black bean
300g bee hoon, soak with hot water
Green vegetable of your choice (I added cabbage and capsicum as it was ready in my fridge)
1/2 onion, sliced
2 tbsp minced garlic

Method:

Remove the dace fish and cut into small bites.

Heat the wok with the oil from the can.

Add the onions and stir fry until soft.

Add the minced garlic and saute until fragrant.

Add the bee hoon and vegetable and fry until soft.

Mix in the dace fish with black beans.

Season with salt and pepper.

Serve.


Enjoy!

Thursday, 29 August 2024

Mee Goreng

I like Mee Goreng, it is the only yellow noodle I do not mind eating.  The stall near my house is ridiculously expensive.  Without any meat, it was already S$6 before covid time.  

Sudden craving for Mee Goreng so I decided to whip up some to satisfy myself.

I have added prawns in, if not this dish is considered economical.  These days, our food prices are going up so much that I am wondering how some can survive.


Learning: This recipe good enough to satisfy the craving and definitely better than the mamak stall near my house. 😋😋

What you need:

3 portions of yellow noodles 
3 long beans, cut small
½ stick carrot (shred fine)
50g cabbage, sliced
1 green chilli, sliced 
4 tomatoes
1 fried Taukwa, cut small pieces
3 small eggs

Rempah
20 pcs dried chilies, remove seeds
6 cloves garlic
6 pcs shallots, slice

Seasoning
3 tsp sugar 
1/3 tsp salt
1 tbsp tomato sauce
A dash of fish sauce
½ tsp dark soy sauce

Garnish
Cucumbers, sliced
Tomato sauce
Lime

Method 

Heat a pot of water and add in dried chilli. Cook for 10 sec and turn off the heat. Then soak for 3 min to soften. 

In a blender, add the softened dried chilli, garlic and a little water. Blend till smooth.

Heat the wok with oil and add in shallots. Stir fry till aromatic and add blended chilli. Cook till oil surface. 

Add in sugar and salt and mix well. 

Add tomato sauce and mix well.  Set aside 

Heat wok with oil. Add in eggs and stir fry till cooked. 

Add long beans, cabbage, carrots and green chilli padi and stir fry till aromatic. 

Add in prawns and mix well.

Add chilli paste (approx. 1 tbsp per serving) and stir fry. 

Add noodles and continue to stir fry till aromatic. 

Add tomato, fried tofu, fish sauce, drizzle some water and stir fry the noodles till a bit dry. 

Add dark soya sauce and mix well. 

Dish up and garnish with cucumber slices, tomato and lime. 

Serve hot.

Enjoy!

Monday, 17 June 2024

Thai spiced chicken with rosti

Trying to clear off the potatoes so today we have Thai spiced chicken with rosti for dinner.

The only time-consuming part is grating the potatoes, the rest is easy as you can marinate the chicken the night before.  

The rosti can also be served with an egg with ham as a meal.

So a rather versatile recipe


What you need:

600g chicken breast fillet, cut into strips
1 tbsp lemon grass, remove the outer layer and only want the young part, chopped
2 tbsp lime juice
1 tsp salt
1½ tbsp oil
2 clove garlic, minced
1 tbsp grated fresh ginger
2 tsp sweet chilli sauce
2 spring onion, chopped
1 tsp pepper

1 lime, cut into 6 wedges

Rosti

600g potatoes
3 tbsp plain flour
1 egg, lightly beaten
1 tsp salt

Method:

Remove excess fats and sinew from the chicken.  Mix in lemongrass, lime juice, salt, pepper, oil, garlic, ginger, sweet chilli sauce and spring onion.  Mix well, cling wrap and chill overnight.

Grate the potatoes, and squeeze out as much water as possible.  Mix with the plain flour and egg.  Season with salt.

Divide into 6 portions.  

On a hot, lightly oiled pan, cook for 10 mins on each side or until golden.  Flatten with a spatula so that you can achieve a more crispy texture.

Drain the chicken and reserve the marinade. 

Add some oil to the pan and cook the chicken for 3 mins on each side or until golden brown.  Brush with the reserved marinade while cooking.

Serve with rosti and a squeeze of lime juice.

Enjoy!

Monday, 10 June 2024

One-pot chicken rice

My girl might be getting a job secured and I reckon she will have to pack lunch from then on.

So this is a One-pot chicken rice that is good to go.


Cutting preparation and marination can be done on a weekend to save time and enhance the taste.

What you need:
yield: 2 - 3 pax

3 chicken thigh, cut into cubes
30g dried mushroom, soaked and cut into cubes
3 slices of ginger
1 tsp white pepper
2 tbsp soy sauce
1 tbsp cornstarch
1 med-sized carrot, peel and cut into cubes

Seasoning for the rice
1 tsp salt
1½ tbsp oyster sauce
1 tbsp soya sauce
½ tbsp dark soya sauce

Method:

Combine chicken with ginger, white pepper, soy sauce and cornstarch.   Mix well. 

Mix the seasoning ingredients together.  Set aside.

Heat the wok with oil and sautee the mushroom until fragrant.  Remove.

Next, add in the carrot and fry until semi-soft.  Remove.

Next, add in the marinated chicken and stir fry until cooked.  Remove the ginger slices.

Then combine the mushroom and carrot into the chicken.

Mix in the seasoning sauce and cook for 1 min.

Place the chicken mixture on top of the washed rice and slightly less water than usual cooking. (the sauce from the chicken makes up for partial of the water needed)

Cook as per normal.

Drizzle in 2 tbsp of shallot oil and add in cilantro. 

Mix and serve hot.

Enjoy!

Thursday, 7 March 2024

Tteokbokki 떡볶이

I was craving Tteokbokki and managed to get a pack of nicely sealed fishballs and Korean fish cake to go with it.  It was a challenge to find the Korean Chilli flakes.  I was told by the famous Korean supermarket chain that they only carry the ones from China which is not the fine type.  By luck, the next day, I found it in a smaller supermarket in Chinatown.  

Tada.... finally craving satisfied.


Learning: On the first attempt, we were worried that it would be too spicy.  On the 2nd we followed it to the T and were pleased with the result.  Girl finds it spicy though but to us, we find it just the way we last had it in Seoul.

Thanks for sharing such nice recipe, you never failed us.


What you need:

500g rice cake (cylinder shaped)
4 cups of water
10 large size dried ikan bilis (remove heads and intestines)
6 x 8”  dried kelp
⅓ cup Gochujang
1 tbsp Korean chili flakes (fine type)
1 tbsp sugar
3 green onions (scallions), cut into 3” long pieces
10 quail eggs, hardboiled and shelled
10 fish balls
Korean fish cakes

Method:

Add the water, dried ikan bilis, and dried kelp to a shallow pot or pan.  Boil for 15 minutes over medium-high heat without the lid.

In a bowl, combine gochujang (hot pepper paste), chilli flakes), and sugar.  Mixed well.

Strain the broth (remove the anchovies and kelp) and add the rice cake, the chili paste mixture, the green onion, the fish balls, Korean fish cake, and hard-boiled quail eggs.  The stock will be about 2½ cups.

Stir gently with a wooden spoon when it starts to boil. Let it simmer and keep stirring until the rice cake turns soft and the tteokbokki sauce thickens and looks shiny (takes about 10 to 15 mins). 

If the rice cake is not soft enough, add more water and continue stirring until it softens.  (to thaw frozen rice cake in cold water)

Remove from the heat and serve hot. 

Note: For any leftovers, just keep them in the fridge and reheat them when you want to eat. You should finish it in a few days.


Enjoy!

Thursday, 4 January 2024

Mac and Cheese

Son has been buying Mac and Cheese from the convenience shop.  Personally, I think the component in it is unhealthy and you literally paid for nothing inside.

I think I have tried once making it at home but I shall document it for his future reference.


Glad that I passed the taste test from the kiddos.  This is seriously calorie and fats loaded.


What you need:

225g dried elbow pasta
60g unsalted butter
70g plain flour
1 1/4 cup milk
1 cup cream 
2 cups shredded medium cheddar cheese divided (measured after shredding)
1 cup shredded Gruyere cheese divided (measured after shredding) 
¼ tbsp salt
¼ tsp black pepper
1/8 tsp paprika 
ham, quantity to your preference
Panko, a handful

Method:

Preheat oven to 160℃ and grease a 9x13" pan.  Set aside.

Bring a large pot of salted water to a boil.  When boiling, add dried pasta and cook 7 mins or until it is a little before al dente.  Drain and drizzle with a little bit of olive oil to keep it from sticking.  Set aside.

Shred cheeses and toss together to mix, then divide into three portions.  Approximately 1.5 cups for the sauce, ½ + ¼ cups for the inner layer, and ½ + ¼ cups for the topping.  Set aside.

Melt butter in a large saucepan over MED heat.  Sprinkle in flour and whisk to combine.  The mixture will look like very wet sand.  Cook for approximately 1 minute, whisking often.  

Pour in about milk, while whisking constantly, until smooth.  

Pour in the cream, while whisking constantly, until combined and smooth.

Continue to heat over MED heat, whisking very often, until slightly thickened.

Remove from the heat and stir in paprika, salt and pepper, and 1 portion of the cheese, stirring to melt and combine.  

Stir in the 1st portion of cheese, and stir until completely melted and smooth.

Mix in the drained pasta and ham into the cheese sauce, stirring to combine fully.  

Pour half of the pasta mixture into the prepared baking dish.  Top with the 2nd portion of shredded cheese, then top that with the remaining pasta mixture.

Sprinkle the top with the last portions of cheese and then a layer of panko.

Bake for 15 minutes, until cheesy is bubbly and lightly golden brown.  


Enjoy!

Thursday, 21 December 2023

Chinese Yam Porridge

Mom is looking so weak so since now she is staying with me, I planned out a more nutritional meal for her.

One of them was this Chinese Yam Porridge which is good for digestion.

Chinese yam (山药) also known as (淮山) is known for being good at balancing the qi in the spleen, lungs, and kidneys, thereby strengthening our immune system.  Benefits include invigorating the spleen to promote Qi production, thereby improving spleen deficiency symptoms such as lack of appetite, loose stools, fatigue, general weakness, indigestion, etc.


What you need:

400g Chinese yam
2 pcs large tomatoes
1 chicken breast
½ cup rice
2 eggs

Method:

Place tomatoes into the microwave and zap for 30 sec.  remove skin and chop finely.

Peel the skin of the Chinese yam and grate.  Wear gloves.

Remove the skin of the chicken and cut the meat into tiny bites (as the elderly tend to have weak bite)

Combine all ingredients and boil until rice is soft.

Lastly, stir in the beaten eggs.

Season with salt and pepper.


Enjoy!

Friday, 25 August 2023

Creamy Carbonara Pasta with bacon

Today for my son’s birthday, I prepared Italian night for him as he loves eating Italian food such as pizza, lasagna, pizza etc.

For Lasagna, I used the trusted recipe that I tried many times before.


This is my first time cooking carbonara sauce as I prefer tomato-based pasta.   I used bacon as it is well liked by my son.  

This egg-based Creamy Carbonara Pasta turned out not too bad and the fussy son was not complaining.  Personally, I think I should make it more saucy.


This is the 1st year we celebrate their birthday without the other bubs.  Hope she has a blast on her 21st birthday.

Happy birthday, kiddos.


What you need:

2 tsp olive oil
200g bacon, chopped
3 cloves garlic, crushed
2 egg yolks (room temperature)
2 eggs (room temperature)
½ cup cream
75g parmesan cheese

Method:

Heat oil in a large frying pan on medium heat.

Add in the bacon and garlic and fry until the bacon is crisp.  Drain.

Whisk egg yolks, eggs, cream, and ¾ of the parmesan together in a bowl.  

Season with salt and pepper.

Add egg mixture and bacon mixture to the cooked pasta.

Season with salt and pepper again.

Toss over low heat until well combined.

Serve with remaining parmesan.

Enjoy!

Thursday, 6 July 2023

Taiwanese Braised Pork Rice 卤肉饭

In May, I was in Taiwan but unfortunately, I did not get to eat the famous Taiwanese Braised Pork Rice 卤肉饭.   Luckily, this is not my first trip to Taiwan if not, I would be really upset about it.  

What I learned from this trip, when you travel with someone, never trust them to say “You plan, I follow” or have someone totally not interested in the agenda.  The effort you put in is lightly to be taken for granted.  No respect, unappreciative, and to the point of belittling.

Since I am missing it, I must cook it myself.  The downside, when it is homecooked, you are mindful of the fats you add in. hahahah.


Enjoy!

Monday, 9 January 2023

Baked feta cheese pasta

This Baked feta cheese pasta was once a viral item from Tik Tok. I have cooked it for my kids and they simply loved it.

A super easy dish to put together within ½ hour and it is delicious.  Initially, I was worried that my son who doesn’t fancy tomatoes will hate it but it turned out he hungrily ate two servings!

Since I did not document it the last time, I am preparing this for our countdown party.


What you need:

2 punnets of cherry tomatoes
400g feta cheese
6 cloves garlic sliced
½ cup of extra virgin olive oil
500g pasta (cook as per packaging instructions)

Salt and pepper

Method

Place cherry tomatoes, garlic, and olive oil.  Season with salt and pepper.  

Place the feta cheese in the center and turn a few times to coat in the seasoned oil.  

Bake at 204℃ for 35 mins.

Cook the pasta until al dente.

Press down the cheese and mix it with the tomatoes.    

Add in the chopped sweet basils

Pour in the warm pasta and mix well.

Serve hot.


Enjoy!

Saturday, 5 November 2022

Cheesy French Toast

Today we have something different from store-bought breakfast.  Let's have some Cheesy French Toast.


What you need:

Bread of your choice
cheddar cheese
Mozzarella cheese
3 eggs
2 tbsp sugar

Method:

Beat eggs with the sugar.  Set aside.

Enclose the bread with the cheese.  Up to you to do the ratio.  

Slice off the edges.

Carefully place the sandwich into the egg.  Let it sit for a while to soak up.  Turn and do likewise.

Heat up the pan and add a small piece of butter.  Once the butter melted.

Usually, a lifter lifts the sandwich carefully and places it in the hot pan.

Fry until golden and turn.  Cook the remaining side until golden.  

Cut into half and serve hot.

Enjoy!

Friday, 21 October 2022

Cheesy Tuna Pasta

The family is getting smaller and it is so difficult to cook just for two.  Then again, I am sick of eating out these days.  

So one pot meal it shall be. Cheesy Tuna Pasta, which I hope hubby will enjoy.


What you need:

130g cheddar cheese, grated
1600g water
2 tsp olive oil
150g tinned tuna, in olive oil, drained
1 tsp lemon juice
A dash of black pepper
200g dried fusilli pasta
80g frozen sweet corn kernels
40g frozen green pea
2 tbsp mayonnaise
1 tsp chili flakes

Method:

Place water and 1 tsp olive oil in TM bowl, 10 mins/100℃/Sp 1.  

In a medium-sized bowl, add tuna, using a fork to flake it.  

Add in the cheddar cheese and mix well with the tuna flakes.

Season with lemon juice, pepper, chilli flakes, mayonnaise and 1 tsp of olive oil.  Set aside.

Add pasta to the TM bowl. 9 min/100℃/reverse speed.  See packaging for cooking time.

Add in frozen peas and corn. 2 min/100℃/reverse speed

Drain and add the pasta to the tuna mixture.   Toss to combine well.

Stir in the mayonnaise and 1 tsp of olive oil.

Serve immediately.

Enjoy!

Thursday, 10 December 2020

Homemade Tortilla

This year's time flew by so quickly.  Am so glad that everyone took this pandemic positively and most of us become socially responsible by not spreading the deadly virus.  

The wrap is such an easy quick bite for either breakfast or lunch or even dinner.   It is also pretty freestyle, whereby you can add your favourite meat and vegetable.  

Another way to use Tortilla is Fajitas which I also like.  I remembered my first taste of that was in Hard Rock Cafe.

Lately, I have been feeling tired, so a quick meal it will be for this submission.  So here is our Grilled Chicken Tortilla.  Did an easy grilled chicken in the air fryer, shred some vegetables, add some cheese and tada.... a quick meal.  I totally forgot about the dressing as the chicken was already very tasty and we were too hungry to notice it until this post.

I decided to make some homemade Tortilla and it was a good decision because the tortilla was really very good.  Soft and has a nice buttery fragrance to it.


Learning experience

I did it by machine and I did not have to worry about the stickiness.  The dough is soft and easy to work with after the rest.  

Only thing is that when I transfer the dough onto the pan, I could maintain its shape.  Maybe a tortilla pan will be easier.

Always to watch the blistering, if overcooked, the tortilla will be hard.

Another way to softened it is to steam it.

I think from now on, I can make some to freeze as use it whenever I want a quick meal.

This recipe is definitely a keeper!

Source

What you need:
Yield 6 pcs

1½ tbsp vegetable shortening (20g) 
1½ tbsp unsalted butter (15g) 
½ cup water

200g.  plain flour
1 tsp baking powder
1 tsp of salt 

Method:

Combine shortening and butter.  Microwave for 15 sec until it melted.  Whisk to combine and set aside.

In a mixer, add plain flour, salt, baking powder together.

Add in butter/shortening mixture and mix well.

Knead for 10 mins until smooth.

Shape into a ball and clingwrap.  Let it rest for 15 mins.

Grease your hand and divide the dough into 2 oz. 

Tension shape into a ball.  Lightly rub with shortening.

Cover and let it rest for 20 – 25 mins.

Lightly flour counter and rolling pin. 

Roll the dough in one direction and turn 90 and roll into a thin disc.  (good enough to see through if possible)

Heat up the nonstick pan well.  Place the disc and let it bubble up and then flip over.  Do not crisp it.

Cover with clean towels to keep them moist.

Enjoy and continue to keep safe and keep on fighting with this covid!  I am sure we can overcome it.

Monday, 28 September 2020

Mushroom and bacon pasta

This dish was supposed to be a creamy base dish but have to omit it as my son's girlfriend is lactose intolerance.

Luckily this Mushroom and Bacon pasta still turned out not too bad.  The bacon really brings out the flavour.


What you need:

400g mushroom
400g pasta
500g bacon
3 tbsp minced garlic
Sweet basil for garnish
Salt and pepper to taste

Method:

Boil pasta until al dente.

Add bacon into a heated pan.  Fry until bacon is crispy.  Remove.

With the bacon oil, add in mushroom and fry until soft.

Add in cooked pasta and mushroom.

Season with salt and pepper.

Garnish with chopped basil.


Enjoy!

Monday, 21 September 2020

Japanese Curry Rice (no cubes)

I always wanted to know how to make Japanese Curry Rice from scratch.  That is not using those store-bought cubes as my kids love eating this.   

After my friend MY shared with me, I have done this numerous times already as we love it so much.  Today, I shall journal it down so that I won't forget it.


Pardon the poor quality photograph as we had an accident in the kitchen before serving and by the time we clean up the mess, it was way past dinnertime.  

Learning experience:

I have done without the Japanese Chilli powder as it was very difficult to buy during the Covid period.  Instead, I replace it with meat curry powder and it was okay.  I tried replacing it with local chilli powder but it did not go down well.

You can also omit the chunou sauce as we did not find it any difference with or without.

What you need:

6 chicken thigh, deboned and cut to chunks
30g ginger, grated
30g garlic, minced
600g onion, cubed small
100g carrot, grated
¼ cup water (increase another 1/2 cup)
3 tbsp meat curry powder
3 cup chicken stock
1 banana, cut into chunk or mashed

500g potatoes, peel and cut to chunks
400g carrots, peel and cut to chunks
2 small bay leaves
1 star anise
1 tbsp chunou sauce (optional)
2 tbsp soy sauce
2 tsp cocoa powder

Roux (if it is not thick enough)
1 tbsp corn starch
3 tbsp water

Method:

Add a tbsp oil and sear chicken until brown.  Remove

Stir fry ginger and garlic until golden but don’t burnt it.

Add in onion and sauté until brown.  This will take a while.

Add in carrot, water and continue to cook until it turns a deep brown and very pasty.

Once onion paste is achieved, add in meat curry powder and cook until fragrant. 

Add in chicken stock and banana. 

Use a hand blender, blitz until smooth.

Add in chicken, potatoes, carrot, bay leaves, star anise, chunou sauce, soya sauce and cocoa powder.  Cook until potato and carrot are soft.

Remove bay leaves and star anise.

If too watery, thicken with roux.

Season with salt (optional)

Serve with rice.

Monday, 13 July 2020

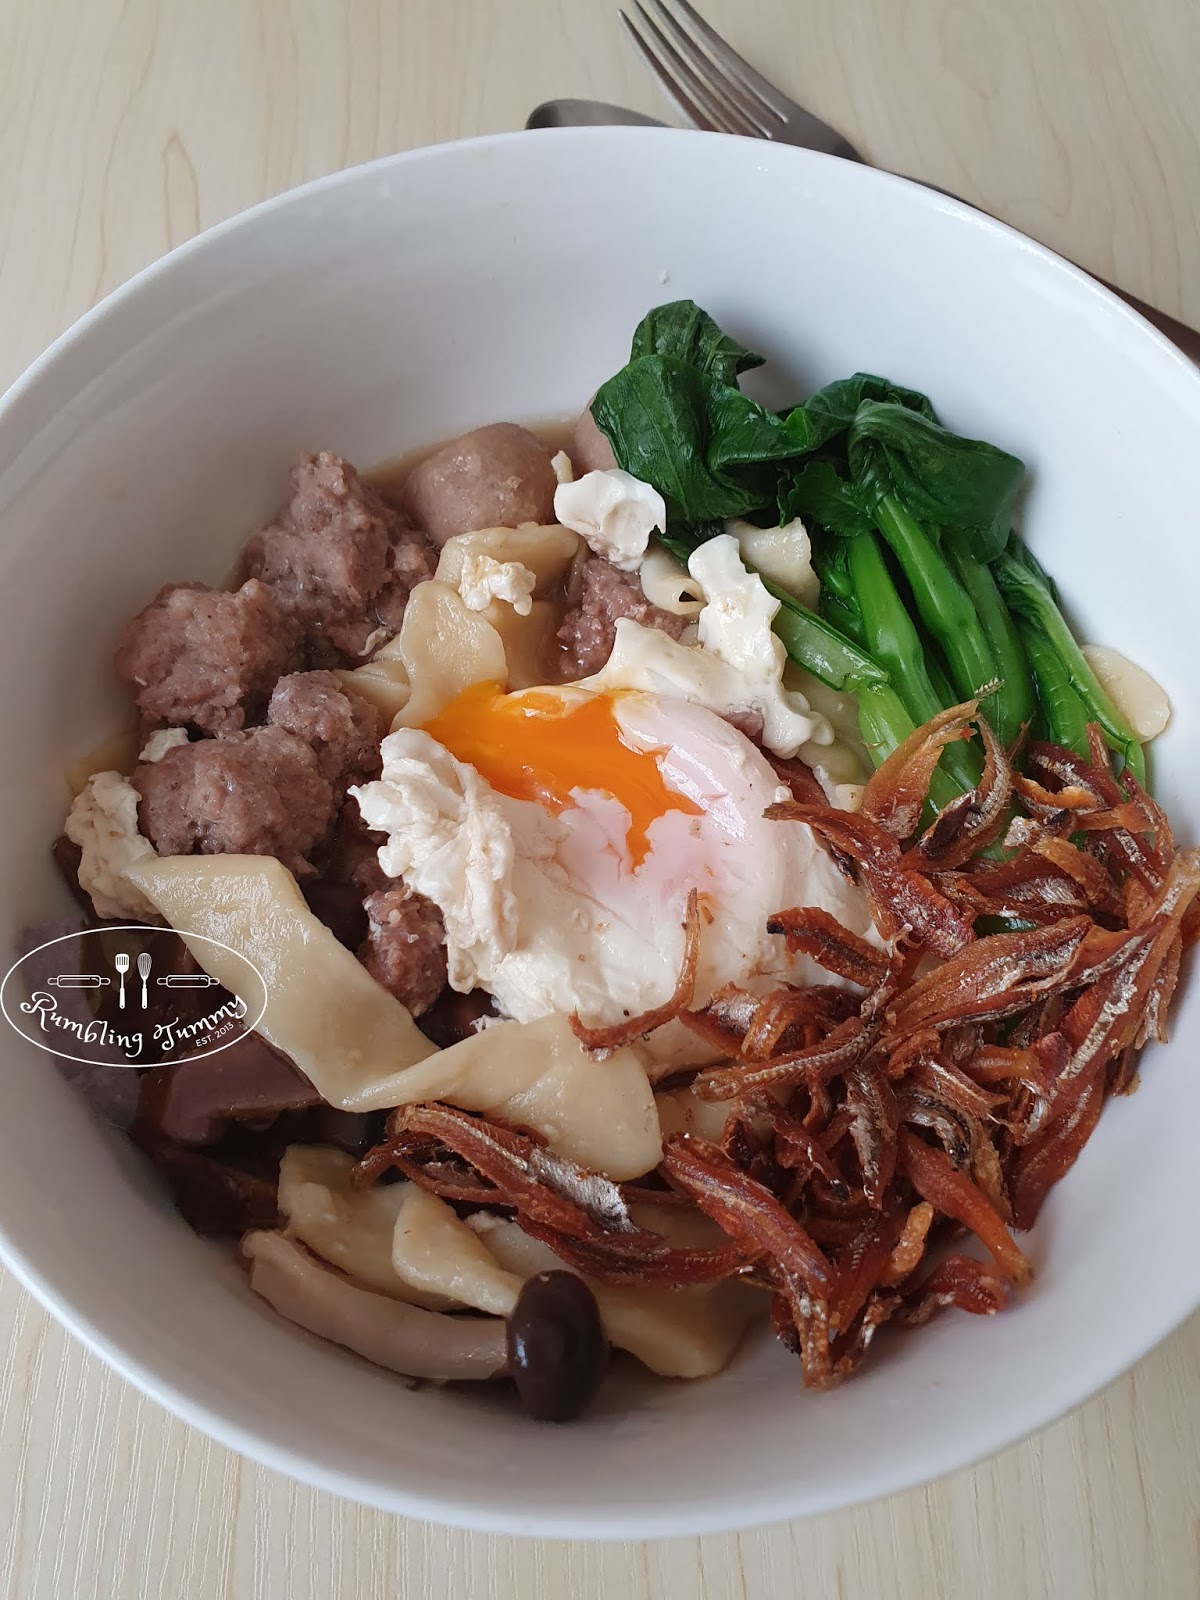
Mee Hoon Kueh 板麵

I had a craving Mee Hoon Kueh aka 麵粉粿 or 板麵.  Most of the time, I like soupy noodles except minced pork noodles.  My preference will always be with soup.

Making the dough for this Mee Hoon Kueh can be fun too.  It can be a bonding activity with the kids.  Watching them roll the dough and pinching the dough.  Ever since the Circuit Breaker started, my better half has taken an active role in the kitchen.  It is good to see him learning to cook.   So for this meal, he took pitched in to prepare the dough.

This can be a fast meal to whip up because the soup base can be done in advance.


Learning experience: 

The texture of the noodle is very good.  Chewy and springy and the addition of eggs bring a nice flavour to a flat-tasting dough.

I need to be careful about this Japanese Soy sauce that I am using, the colour is very dark.

What you need:

Mustard, cut to 2"
Meatball, one packet
6 mushroom, soak to soften, sliced
Handful of dried Ikan bills

Minced pork

300g minced pork
Corn starch
Soy sauce
Pepper

Marinate
Combined minced pork, soya sauce, pepper and corn starch.  Marinate it for 1 hour.

Pork/ikan bilis broth

200g ikan bilis, rinsed
2 pcs pork bone
4 clove garlic
500ml water

Method:

In a pot, add a little oil and fry ikan bilis and garlic until fragrant. 

Add in pork bone, and water and bring to a boil.  Let it simmer for 1 hour.

Drain, and season with salt and pepper.

Dough

300g plain flour
1 tbsp oil
2 eggs
50g water
½ tsp salt

Method:

Using a chopstick, mix all the ingredients until a soft dough is formed.  Depending on flour absorption, you might need a little bit more water.  Cover and let it sit for an hour.

Knead the dough until smooth.  No need to be window pane.

Divide into 3 portions.  Cover the other 2 to prevent drying.

Roll the dough into a rectangle and cut into strips.  Cover.

Fried Ikan Bilis

Heat up a small pot of oil, deep fried ikan bilis until golden and crispy.  Drain.  Set aside. 

Note: To achieve crispy ikan bilis, I was taught not to wash the ikan bilis.  You need to fry it straight from the packet.  So I normally use more oil so that I can "wash" them in the oil.  Do not keep the oil.

Assembly

Bring a pot of water to boil, blanched the mustard until it turns dark green.  Remove and place it inside cool water to stop the cooking process.  Drain and set aside.  Do not throw the water.

Add the sliced mushroom to the broth and bring it to a boil.

Add in the meatball to the broth and cook until meatballs float up.  Remove.

Add in the minced pork and cook it for 3 mins.  Remove.

Using the same pot of boiling water for blanching the vegetable, pinch dough and cook until the dough floats up.  Transfer into serving bowl.  

Add in the mustard, meat balls and minced pork.

Crack an egg and top off with a very hot broth.

Garnish with fried ikan bills. 

Serve immediately.
 

 Enjoy!