Showing posts with label Pie/Tart 馅饼. Show all posts

Monday, 7 March 2022

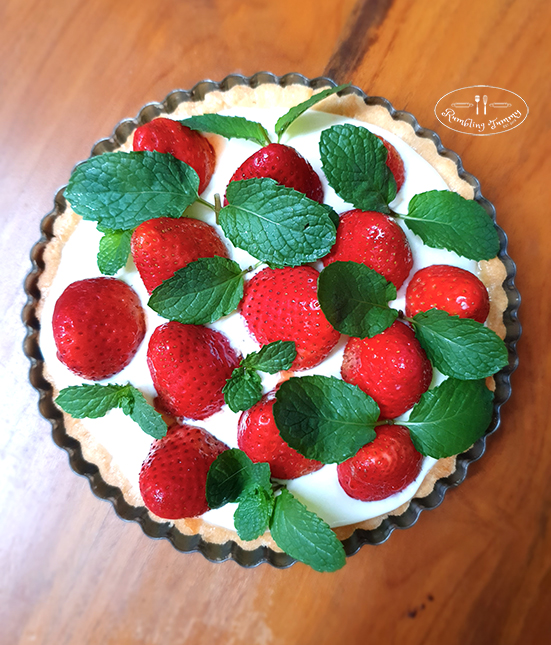
Strawberry Tart

Saw some strawberries on sales and bought two punnets to try. 

Today shall make Strawberry tart.


Learning: The tart crust is easy to handle when I roll it between two parchment pieces of paper.   Finds the cream cheese fillings a little soft and needs to serve immediately after it has set.  

Overall, the recipe is nice as it is not too sweet.


Source

What you need:
6” tart

Crust

56g unsalted butter
110g plain flour
30g icing sugar
A pinch of salt
22g egg, beaten

Fillings

100g cream cheese, room temperature
15g sugar
20g milk

45g whipping cream
10g sugar

Method:

Cut cold butter into cubes.  

Sift plain flour and icing sugar, and add a pinch of salt.  Whisk.  

Add in butter and using a pastry cutter, cut butter into the flour mixture until crumbs like.

Add in eggs and mix until a dough is formed.

Put into a bag and flatten with a rolling pin to form a disc.  Chill for 10 mins.

Lightly dust countertop and rolling pin and roll the dough between parchment into a 8” disc.

Place onto the pie mold and scrape off excess.

Using a fork, indent some holes in the pastry.

Bake at 180℃ for 12 mins.

Remove and add a few white chocolate chips.

Wait till the chocolate has melted, use a brush and coat the tart crust.

Cool completely before removing the crust from the mold.

Fillings:

In a bowl, add in cream cheese and sugar and whisk until soft and smooth.

Slowly whisk in the milk until combined.

In another bowl, whisk whipping cream and sugar until soft peak.

Fold the cream cheese mixture into the whipping cream until well combined.

Cut the strawberries into slices.

Fill half of the cream mixture and spread evenly.

Lay some strawberries and fill the remaining cheese.

Decorate with some whole strawberries and mint leaves.


Enjoy!

Monday, 27 May 2019

Molly's Egg Tart

Transition Post (2012)


One of the recipes that I wish to transition from my old blog to here is this Molly's egg tart from one of the website.

Overall, it is an easy recipe to attempt especially for the beginner.   Should one day, my children decided to try, this will be the first one to attempt.

Thanks, Molly.


Learning experience: 

The crust is rather dry in handling, a tablespoon more milk or water will be good.  The egg custard is good though but I didn't have enough egg mixture to fill in all my crust (save the remaining crust for another day).

Shape the crust thinner and fill the custard to the near brim. (For my experience, mine is too little and the crust is too thick).

This is pretty similar to Hei Ma Ma's.  


What you need:

Egg Custard :

350g water
120g castor sugar
100g fresh milk
5 eggs

Method:

Place water and sugar in a pot and boil till sugar is dissolved. Let it cool completely.

Add milk into the sugar mixture and stir.

Lightly beat the egg and add into the above.

Mix well and strain the egg mixture.  Set aside.

Short Crust Pastry:

250g unsalted butter, soften
100g castor sugar 
1 egg
500g plain flour
1 tsp - 1 tbsp milk or water (I will add this if the dough is too dry)

Method :

Cream the butter and sugar till creamy.

Add in the egg and mix well.

Lastly, add in the flour and mix to form a soft dough. If the dough is sticky, you can add some more flour to mix till it is smooth and not sticky (add the flour a little at a time).

Mould into the small cupcake mould till the dough is used up

Pour into the prepared cup and bake at 160°C for 20-25 mins or till the crust is slightly brown.


Enjoy!

Sunday, 12 May 2019

Easy Strawberry Tart

We enjoyed this Easy Strawberry Tart so much that I have to make one for my mom on Mother's Day.

Though it uses digestive biscuit, the crust is so unlike the usual oily based feel.  It stays crispy for a long time as well.

A good thing is that I managed to get really big and juicy strawberries yesterday.


To all mothers out there, 
Happy Mother's Day!


What you need:

52g digestive biscuits
52g cake flour
1.5 tsp castor sugar
a pinch of salt
13g unsalted butter

35 instant custard powder
87g milk
25g whipping cream
1/2 tsp kirsh

A punnet of strawberry
pistachio, chopped

Method:

Preheat oven to 180°C.  Prepare a 15 cm tart mould.

Melt the butter and let it cool.

Place digestive biscuits in a blender and blend to fine.

Combine biscuit crumb, cake flour, salt and melted butter.  Mix until crumbly.

Transfer to tart mould and press firmly and evenly.

Bake for 10 mins or until golden brown.

Transfer to a rack to cool completely.

Cut strawberries into slices.

In a bowl, mix instant custard powder and milk until thickens.

Add in whipping cream and kirsh and mix until smooth.

Transfer to cool tart crust and spread evenly.

Arrange strawberries around it.

Brush a thin layer of honey.

Sprinkle chopped pistachios.

Serve.


Enjoy!

Monday, 9 July 2018

HongKong Egg Tart

My girl loves egg tart and I wish I can do it more often.   I realised that so far, I only attempted one recipe in this blog.

Though I rather like the other recipe filling, I was keen to explore another crust recipe.  So today, I shall attempt another recipe on this HongKong Egg Tart.


Learning experience: 

The crust is nice and buttery.  It is easy to handle as well.

I actually managed to yield 20 pcs from one recipe with a nett weight of 28g.  

I have done two batches.  The first based I actually browned it too much on the crust so I will reduce this 1st bake at 7 mins instead of 10 mins.

Also, I have tested out on air fryer for the final bake and it should be at 165 for 13 mins.

I have brought a batch to a party and the feedback was rather good as well.

So this recipe is a keeper.

Source

Makes about 10-12 egg tarts (3”)

What you need:
Crust

200g plain flour
25g cake flour
125g butter, softened
55g icing sugar
1 egg, whisked
a dash of vanilla extract

Egg Custard:

2 eggs
70g caster sugar
150g hot water
75g evaporated milk
½ tsp vanilla extract

Method (crust):

Cream butter and sugar with mixer over medium speed until the mixture is light and fluffy.

Beat in egg, one at a time.

Add vanilla extract, mix well.

Sift in flour in two batches, and mix until all combined. Knead into dough briefly.

Roll out the dough to a ½ cm thick.

Cut dough with a cookie cutter that is just a bit smaller than your tart tin in size and line dough in the tart tins.  Lightly press to let dough cover the entire mould

Method (custard):

Add sugar into hot water, mix until completely dissolved.

Whisk egg with evaporated milk.

Pour in sugar water. Mix well.
Strain egg mixture into a spouted cup.  Carefully pour egg mixture into each tart shell.

Preheat oven to 200°C.  Set baking tray to the lower third of the oven.  Bake tarts for 7 mins until the edges are lightly brown.  (this temp is based on my oven)

Lower the heat to 180°C.  Keep an eye on them. Once you see the custard being puffed up a bit, pull the oven door open about 2 to 3 inches.

Bake for another 10 to 15 minutes until the custard is cooked through.  (do the toothpick stand test to confirm doneness)


Enjoy!

Thursday, 22 March 2018

Tiramisu Tart

I made this Tiramisu Tart for a gathering and it was well received by many.

Initially I wanted to garnish it with chocolate curls but my block of chocolate was too hard and I did not have time as I was already late for the gathering.


So today, I did another round for my family.


Learning: Though the steps seem to be daunting but it is relatively easy to put together.  Just need to plan the timing.

The crust is easy to handle too and it is not oily.

For the chocolate layer, use good quality chocolate so that the chocolate taste will shine.

For the cheese layer, I would halved the quantity as I can yield enough for 2 tarts.

Also for the garnish, I just waited for the chocolate to be a little softer (with our climate) so that I can just grate it, if not, it will end up like the first picture.


What you need:
Crust 

112g butter
½ tsp vanilla
1 tbsp coffee liqueur


210g plain flour
½ tsp salt
30g icing sugar
30g cocoa powder

Method:

9” pie tray with removable base.

Melt the butter, add in vanilla and coffee liquer. Mix well.

In a bowl, combine plain flour, salt, icing sugar and cocoa powder.  Whisk to combine.

Pour the butter mixture to the flour mixture and mix to combine.

Pour in the dough and press into the tray covering the sides.

Prick with fork and bake the tart 190°C for 9 mins.  Set aside to cool.


What you need:
Chocolate layer

175g heavy cream
18g corn syrup

112g chocolate
15g butter
1 tbsp coffee liquer

Method:

Bring the heavy cream and corn syrup just to a boil.  DO NOT BOIL.

Pour over the chocolate, butter and coffee liquer and mix until well blended.

Pour into the pie crust.  Freeze until hard.


What you need:
Cheese layer
(half this recipe to make 1 tart)

225 cream cheese
¼ cup whipping cream
30g unsalted butter, softened
4 tbsp icing sugar (adjust sugar level to your liking)
1 tbsp coffee liqueur
1 tbsp coffee

¾ cup whipping cream

Method:

Whisk cream cheese, icing sugar, whipping cream, coffee liqueur and coffee until fully incorporated.  

Whisk whipping cream until stiff peak.

Fold the whipped cream to the cheese mixture together.

Pour the cream mixture onto the frozen chocolate layer.  Spread evenly and chilled until set.

Garnish with shaved chocolate.

Thaw a little before cutting with a sharp knife.

Enjoy!

Monday, 26 February 2018

Bacon and spinach quiche

Bacon and spinach quiche for tonight's dinner.


What you need:

6 large eggs, beaten
1½ cup heavy cream
Salt and pepper
100g baby spinach
Bacon
200g shredded cheese
1 9” pie crust

Method:

Preheat oven to 190°C.

Whisk eggs, cream, salt and pepper together.

Layer the spinanch, bacon and cheese in the bottom of the pie crust.

Pour egg mixture on top.

Bake for 35 – 45 mins until the egg mixture is set.

Serve hot.


Enjoy!

Monday, 3 April 2017

Cheese Tartlet

Though my girl loves tarts especially egg tart, I hardly made tarts because my skill in molding the pastry to the tart tin is terrible.  Due to my warm hands, the pastry often melts before I even had a chance to do it properly plus I like my crust to be thin too so it became really challenging.  The sticky dough thus frustrates me a lot as I cannot do a good job.

I was eyeing on this tart press for the longest time but it was really expensive here.  I did enquire with an online shop in Malaysia but it turned out that they have big difference in quote to a Singaporean and to a Malaysian.  After conversion, there is no difference if I get it in Singapore.    

Anyway, recently during my KL trip, I managed to buy a tart press and I was delighted.

ET’s Cheese Tartlet greeted me this morning during my morning FB read. 
With this cool wet weather, I guess it will be the perfect time to bake some tarts for my princess and since I have some cheese blocks in the fridge, Egg tart will have to wait.


Findings: This recipe is so easy to put together and it tasted yummy too.  Going to share some with my neighbour.

The crust is crunchy and not too sweet.

I have added in some berries jam so my cheese mixture was just nice to fill up all 49 pcs.  


Thanks ET for sharing such a nice recipe.  


What you need:
2" tart
yield : 49 pcs

Crust

160g butter
40g castor sugar
half egg, beaten
250g plain flour 
40g almond flour

Method:

Cream butter and sugar until light and fluffy.

Beat in egg.

Add in flour and mix until it forms a dough.

Mold into the tart tin and bake 170°C for 20minutes.

Filling

250g cream cheese. Leave it in room temp for 15 minutes
15g butter
50g icing sugar
30g egg beaten slightly
10g non dairy whipped cream, optional *
½ tsp vanilla

Method:

Beat cheese, butter and icing sugar until light and fluffy.

Add in the egg little by little.

* If batter is too heavy, FOLD IN GENTLY the whipped cream

Assembly

Arrange shells in a tray

Put in flavour filling like choc kr blueberry, Nutella etc

Pipe cream cheese onto the shell.  Hold the bag horizontally. Squeeze the cheese into the shell.

Bake at 170°C for 10 to 15minutes.

It is done when the cheese no longer sticks to your fingers.

Monday, 22 August 2016

Mascarpone cheese tart

I like tarts but I am so lousy in shaping the crust.  I don't know whether it is my warm hand or the weather.  Somehow, I never get it pretty.

Have a tub of mascarpone that intended for tiramisu but never got to it.  So change focus and did a Mascarpone Cheese Tart instead.


Findings: If you like not so cheesy dessert, this fits the bill.  It goes really well with the chocolate crust.

My friends also like it because it is not so sweet.  A good balance with the chocolate crust.

As always, I have no easy task with the dough (I blame it on my warm hands).  I need to work very quickly and between two baking paper to manage to shape them into the mould.

So break into smaller dough portion for each tart mould if you are attempting this with warm hands.

Next time, I have to roll it thinner.

Well I have to keep on practicing!

What you need:

Sweet pastry

350g plain flour
20g cocoa powder 
125g unsalted butter, small cubes and frozen
125g castor sugar
2 eggs 
1 egg yolk
Pinch of salt

Cheese Fillings

220g cream cheese
100g castor sugar
1 tsp vanilla extract
2 eggs
1 egg yolks
200g mascarpone cheese
1 tsp plain flour

Jam

Method
Crust

In a mixing bowl, with a k beater, combine flour and butter. On slow speed, blend until fine crumbs.

Add sugar and mix well.

Add eggs and egg yolks and mix until dough formed.

Remove and wrap pastry dough in a sheet of greased proof paper. Let it rest in the fridge for one hour. 

Roll the pastry dough into 2mm thick.

Mould into tart tin and then lined with baking paper and pie weights. Let it rest chilled for 30 mins.

Preheat oven to 190 deg.

Remove pie dough and bake for 15 mins.

Brush with beaten egg and bake for another 7 mins. Set aside.

Fillings

Beat cream cheese, sugar and vanilla until fluffy.

Beat in eggs and egg yolks.

Add in mascarpone cheese and stir until well incorporated.

Fold in the flour.

Assemble

Divide fillings evenly among the tarts crust.

Add a small tsp of jam in the middle.

Bake for 45 mins until it is set.

Let it cool in tin for 10-15 mins. Remove and cool completely on rack.


Giveaway 

I have decided to bring forward the date for this giveaway as I didn't not factor in the posting time.

So I will offer up to 23 August 2016 and have the lucky draw drawn by my girl.  It is her birthday and what a great way to celebrate is to announce a winner!


Good luck!

Friday, 5 August 2016

Spinach and mushroom Quiche

These days, I only have to cook one meal a day as my kids are hardly home for lunch.  I also got bored cooking Chinese cuisine as dinner.  

So today I opted for Spinach and mushroom Quiche for our dinner.   One dish that cater to all the needs - simple, filling and vegetarian.

Who says life has to be complicated?   


Findings: Yummy is all we can say.

Adapted: here

What you need:

250g plain flour
140g unsalted butter, cold, cut into small dices
Pinch of salt
1-2tbsp iced cold water

Filling

1 egg
75ml milk
75ml whipping cream
10g finely grated Parmesan cheese
salt and pepper to taste

Topping

100g cheddar cheese, grated
1 cup spinach, cooked
200g mushroom, cooked

Method:

In a mixing bowl, combine flour and salt, whisk to combine.
 
Add the butter and whisk at slow speed until the mixture looks like coarse meal.

Drizzle a tablespoon of water and press until the dough come together, (adding more water until the dough will come together), take out of the bowl and press into a ball.

Cover with a plastic warp and refrigerate for 20 minutes.

Roll the dough, cut into desired size and line a 9" pie dish with the dough.
Prick the dough with table fork (or bamboo stick). Refrigerate for 20 minutes.

Preheat the oven to 180°C

Line the dough with aluminium foil and fill with pie weights.

Bake until the crust is set and dry 12 minutes.

Remove the pan from the oven and remove aluminium foil and pie weights.

Return the crust to the oven and bake until the crust is completely dry and light golden brown, another 5 minutes.

Mix the filling mixture together.

Place the topping into the crust, then pour the filling over the topping.

Bake for 25-30 minutes or until the top start to set and golden brown.


Cheers!

Saturday, 21 November 2015

Strawberry Balsamic Galette

I have never pay much attention to the name Galette until this month Bake Along event and when I check out Pinterest, my conclusion was it is an open pie.

Now as I sat down to write up this post.  Something prompt me to do a little read up on this.  Surprisingly, Galette according to the French cuisine is basically a freeform crusty cake and the description according to the Wikipedia, is totally different from what I am offering today.

Mmmmm now I wonder who modified it, the American?

Well, it is raining and I think I have enough today, I am going to curl up and eat this Strawberry Balsamic Galette for tea.


What you need:

Dough

3 tbsp Cold butter
40g shortening
4 tbsp ice cold water
215g plain flour

Fillings:

500 fresh strawberries
2 tbsp Alce Nero balsamic vinegar
4 tbsp honey

1 tsp flour
1 tsp sugar
1 tsp almond flour

1 egg + 1 tbsp milk for glazing

Fresh ground pepper

Method:


Slice strawberries, toss in bowl with balsamic vinegar and honey. Let sit for 1 hour or more, up to 24 hours. 

Using a K beater, beat cold butter, shortening into the flour until crumb like.

Add in cold water and mix until water is incorporated.  Knead to form a dough.

Wrap in cling wrap and chill for 1 hour.

For the fillings: 


Combine the flour, sugar and almond meal and sprinkle around the center of the dough, leaving 2 inch border.

Shape dough into a disk.

Lightly floured the working top and roll dough into 10" (for a 9" dish).

Place dough onto dish.

Lightly scattered 1 tbsp of almond meal mixture into the centre of the dough.

Scoop strawberries into dough centre.

Fold in the dough only for the sides.

Brush egg glaze and drizzle some sugar on the dough sides.

Bake at 190°C for 45 mins or until filling is bubbly and sides are golden brown.

Put the remaining balsamic and honey in a small saucepan, adding 2 more tbsp of balsamic and 3 tbsp of honey, boil until thickened.

Remove galette from oven and top with freshly ground pepper. 

Serve warm with balsamic honey sauce. 


This is for Bake-Along #88: Galette hosted by Zoe from Bake for Happy Kids, Joyce from Kitchen Flavours and Lena from Her Frozen Wings.


Enjoy!

Wednesday, 28 October 2015

Lava Cheese Tart 流心芝士撻 (1) (Airfryer)

Lava Cheese Tart is so popular in Saporro and now in Hong Kong.  Since I won't be visiting these places any sooner.  I decided to try my hand at it.

When I first came to know about this tart, there were only two recipes available online and both doesn't seems to be the close to the original.  

Within a month or so, more recipes were popping up in the cyberworld.

Actually my crave picks up again after talking to a fellow blogger who went to Japan recently.  Since I have all the cheeses on hand, I pick this recipe to try.  I will be eagerly looking forward to her experiment as hers might be the closest to the real stuff.  


Findings: When you cut immediately after baked, the lava effect is very evident.  


Upon resting around 5 mins, it will not be runny but will still yield a soft curd.

Overall, the tart is yummy but as to whether it is the same as the original, I was told that the original has a distinct cheese taste as I guess I won't be able to replicate that as getting Japanese cheese is not easy.

Perhaps you can incorporate sharper cheese and let me know how your experiment turn out.

In the meantime, I think this will be able to satisfy my craving for the time being.
Adapted : Siu Kitchen

What you need:
yield 8 pcs

Crust

40g unsalted butter
40g icing sugar
30g egg 
100g cake flour

Method:

Cream butter with icing sugar until light and fluffy.

Add the egg and mix well.

Add in cake flour and knead to incorporate well.  DO NOT OVER KNEAD.

Place dough in cling film and let it rest in the fridge for ½ hour.

Divide dough into 8 balls and shape dough into the mould.

Poke little holes in the dough and blind bake for 12 minutes at 180°C until light golden brown.

Note: Air Fryer at 170°C for 10 mins


Cheese Filling

160g cream cheese
15g parmesan cheese
40g icing sugar
80g milk
15g unsalted butter
50g egg, beaten

Method:

Melt cream cheese, parmesan cheese ang icing sugar over a bowl of boiling water.

Add the milk and butter and mix again until smooth.

Remove bowl from heat and stir in egg.

Pour the cheese filling into the baked tart crusts and then bake for 5 minutes at 180°C.

Cool tart a little before removing.


Note: Air fryer: 180°C for 5 mins.


Enjoy!

Thursday, 8 October 2015

Crack Pie

Please hop over to here for the give away.  A chance for you to win some awesome organic product.


During a conversation with my baking kaki, she ask me about Crack Pie.  Did a quick search and realised it was originated from Momofuku Milk Bar back in 2010. 

Just like the recent Cronut that was so talked about, apparently back in 2010, crack pie was the next big thing before that 30 mins bread recipe, I was told.


Well, since my last not so pleasant trip to this city (blizzard and not so nice people), I doubt I will get a chance to go back again to sample this pie.

Without further ado, let's try this recipe and see what is the hype about on this recipe. 

Strangely, this pie didn't crack at all.  I wonder why they named it so or was it that the crust method has to do with how they came up with the name. 


This Crack Pie is definitely not for faint hearted folks.  It is a dessert that you will only eat once in a blue moon.  At US$44 a pie, I knew I just got to try it.  

The amount of fats are high and I made the right choice to reduce the sweetness level vastly.

Will I have a go at this again?  Yes, I will definitely rework on the crust ratio though.

If you have tried this, hope you can share your experiment as well.


Findings: 

Overall, the pie is very interesting and pleasantly nice to eat.

The crust actually expanded after baking and thus you get a slightly thicker crust than norm.  I also wasn't please with the crumb as it falls apart easily and was a tad too oily. 

You need to chill it a little to firm out the crumbly crust or else you will have a hard time removing it.  


Adapted : Brown Eyed Baker

What you need:

Cookie crust

80g plain flour
⅛ tsp baking powder
a pinch of baking soda
¼ tsp salt
113g unsalted butter, room temperature
71g light brown sugar
3 tbsp castor sugar
1 egg
180g rolled oats

Method:

Preheat the oven to 190°C.

In a medium bowl, sift flour, baking powder, baking soda and salt.

In the bowl of a stand mixer using the paddle attachment, beat the butter, brown sugar and sugar until light and fluffy.

Beat in the egg into the butter mixture until fully incorporated.

Beat in the flour mixture, a little at a time, until fully combined.

Stir in the oats until incorporated.

Spread the mixture onto a 9” X 13” baking sheet and bake until golden brown and set, about 20 minutes.

Remove from heat and cool to the touch on a rack.

Crumble the cooled cookie to use in the crust.

Crust

Crumbled cookie for crust (1 recipe)
57g butter
1 tbsp light brown sugar
¼ tsp salt

Method:

Pulse the crumbled cookie, butter, brown sugar and salt in a food processor until evenly combined and blended (it is ready if the mixture is able to clump together).

Divide the crust between 2 (10-inch) pie tins.

Press the crust into each shell to form a thin, even layer along the bottom and sides of the tins.

Set the prepared crusts aside while you prepare the filling.

Filling

150g sugar
100g light brown sugar
½ tsp salt
21g milk powder
150g butter, melted
170g heavy cream
1 tsp vanilla extract
4 egg yolks
30g cornstarch
2 prepared crusts

Powdered sugar, garnish (I omitted)

Method:

Heat the oven to 170°C.

In a stand mixer, whisk together the sugar, brown sugar, salt and milk powder.

Add in the melted butter, then whisk in the heavy cream, vanilla and cornstarch.

On low speed, gently whisk in the egg yolks, being careful not to add too much air.

Divide the filling evenly between the 2 prepared pie shells.

Bake the pies, one at a time, for 15 minutes, then reduce the heat to 160°C and bake until the filling is slightly jiggly and golden brown for about 10 minutes.

Remove the pies and cool on a rack.

Refrigerate the cooled pies until well chilled. The pies are meant to be served cold, and the filling will be gooey.

Dust with powdered sugar before serving.


Saturday, 11 July 2015

Air fried Nutella Prata

There was a period that I was very much into reading artisan bread.  I wanted to learn how to shape bread.  My interest ended when I failed to make my own natural yeast starter.  Nevertheless, I still love reading how people can come up with creative idea in braiding bread.  


In my home, frozen prata can often be found in my freezer.  I love how versatile frozen prata is.  I like the idea of how quickly I can whip out a tuna, chicken puff or Paté Chaud for lunch which my girl adores.  Strangely, I have never attempted turning it into something sweet.

Recently I saw another brilliant idea from RC. She has created a beautiful piece of edible just by using prata.  I knew I must try soon.  After all, my kiddos love Nutella and prata.


Findings: Mine didn't turn out as gorgeous as R's.  I still need more skills to learn how to make them twist nicely.

Using air fryer to do the job, I find it easy and fuss-free as these days, the kids like to sleep late.  So I just prepare individual portions, freeze it and bake when they are ready to eat.  So that it is still crispy.

Thanks, R for sharing this brilliant idea.

What you need:
Serve 1

2 slices of frozen prata
nutella
Egg wash

Method:

Place a baking paper on a cutting board.  

Put one piece of frozen prata on the paper and spread the nutella round it.

Cover with the second prata.

Position a glass cup in the middle and using a knife, slit 8 sections.

Holding two sections, twist two rounds.  

Brush with egg wash and bake at 190 deg for 7 mins using an air fryer.


Note: For clearer instructions on how to twist the prata, I have used Steve's Kitchen as a reference.  


Happy Saturday! 


Sunday, 10 May 2015

No bake Salted dark Chocolate Mascarpone Tart

Happy Mother's Day to all my mommy reader.  Have a good one.


I managed to trim down my weight back to before Oct's scale.  I was really happy because, that extra weight really makes me sluggish and lousy.

Was craving for a cheese tart after I spent some time browsing Pinterest.  It is definitely not a good idea if you are on diet but hey, I am on celebration mode!

Went on to buy myself some cheese and tada ..... No bake Salted Dark Chocolate Mascarpone Tart.  I fell in love with this the moment I saw it.  It looks good and I was enticed.

I am also happy that I can participate this round of Bake Along as I kept missing out the dateline.  Well this always happens to procrastinator right?  


Verdict: This is a delicious pie, my family loves it to bits.  It tasted like light ice cream.  This is best eaten at home, not a pie that you will bring to a party as it melts rather quickly.

My family prefers it with salt as the orea base already has a hint of saltiness in it.


Source: Pinterest


What you need:

200g oreo cookie crumb (already blitz fine)
85g melted unsalted butter
117g cold whipping cream
275g soften mascarpone cheese  
150g sugar
1 tsp vanilla

8 oz dark chocolate
1 cup whipping cream
1 tbsp sea salt flakes


Method:

Mix cookie crumb with melted butter and press onto a 9" pie pan.  Chill in freezer.

Whip the whipping cream until soft peaks form.  Set aside.

Whip mascarpone, sugar and vanilla until incorporated.  

Fold in the whipped cream.

Pour over the chilled crust.

Place back into freezer for at least 1 hour.


I am submitting this for the Bake-Along #78 : Bake-Along 4th Anniversary Theme – Cheesecake, hosted by Lena of Frozen Wings.


I'm submitting this post to the Best Recipes for Everyone May 2015 Event (Theme: My Favourite Desserts) organized by Fion of XuanHom'sMom and co-hosted by Aunty Young


Happy Sunday!