Showing posts with label Jam/Curd/Condiment 果酱/调味品. Show all posts

Thursday, 10 August 2017

Milk Kefir Cream Cheese 克非尔奶油乳酪

We are a big fan of cheese and we nearly love all kinds of cheeses.   Eating cheese is expensive though in Singapore.  Wish they can lower down the prices, then again, we have no cows here. 

I am always curious how cheese are make.  So when I found out that we can make cheese on our own, I jumped onto this idea.

Since I have been cultivating Milk Kefir for the family, this will be ideal time for me to experiment.

I am so happy to know that it is easy to churn and nearly effortless.  

Now let's dig into our homemade Milk Kefir Cream Cheese 克非尔奶油乳酪?  I shall have it served with crackers later.

Findings: The texture is really creamy and just like store bought.  Totally love it.

What you need:

300g Milk Kefir

Method:

After the milk kefir went through its second fermentation.

Put a liner into a coffee dripper.  

Pour in the milk kefir and let it drip off the whey.

Note: I place the coffee dripper into a big container and just let it rest in the fridge for a day.


Tuesday, 11 April 2017

Black Pepper Sauce 黑胡椒酱

My family loves pepper.  I think the best that I know is from Sabah and recently, I found a good one from Indonesia as well.

I was given packets of this awesome black pepper from my hubby's friend, I went on to made Black Pepper Sauce 黑胡椒酱 so that I can whip out any black pepper dish easily.

I took the extra step of roasting the pepper because I needed it to be clean and also grind it first before blitzing it in the blender as I didn't want any peppercorn in my sauce.


Findings: I must say this is really a wonderful sauce and it is very versatile.  My family likes it.

Definitely a keeper!


What you need:

80g black pepper
6 small onion, skin removed
6 cloves garlic, skin removed

100g ketcup
150ml water
30g maggi seasoning
30g HP sauce
45g sugar
1 tsp salt

60g butter

Method:

Gently rinsed black pepper and roast it in a frying pan until fragrant.

In a spice blender, coarsely grind the black pepper.

Blitz small onion, garlic and black pepper together until fine.

Heat oil and saute the mixture until fragrant.

Add in the rest of the ingredients except butter and bring to a boil.  Remove from heat.

Add in butter and stir until butter dissolved.


Try it!


Wednesday, 17 December 2014

Yuzu Curd

During my last trip to Japan, I was desperately looking out for Yuzu.  Unfortunately I came home empty handed.  

When M from Dreamer Loft offers to bring these rare gems home for me, I quickly took up her offer.


I never seen Yuzu, least to hold one on hand.  I was so amazed by the fragrance this grumpy looking citrus gives out.  I must say the smell was unbelievable beautiful .  

Despite its size, the seeds were amazingly big and many.  Yuzu is known not to be plump and juicy but I didn't expect it to be so little.  With 6 yuzus, I only managed out 94g of juice.    

Initially I wanted to make yuzu sorbet as I had tasted some really wonderful ones during my recent Hokkaido trip but unfortunately I realized that there was some typo error to the recipe that I wanted to try from.  So I turned my attention to Yuzu Curd instead. 

I have tasted yuzu curd that my friend, D made for one of those macaroon session we had last year .... eeer was it this year?  and it was delicious.


Anyway, according to M from Dreamer's Loft, Yuzu is available only in Nov - Jan.  So if you can get hold of some, try it and will be nice to give this out as Christmas gift.

During this period, you might also want to check out Japanese supermarket or Cold Storage as D managed to buy from there.

For me, until I find yuzu in Singapore, I am going to keep this bottle for myself.


This post is linked to Cook and Celebrate (Christmas 2014)
organised by Yen from Eat your heart out, Diana from Domestic Goddess Wannabe and Zoe from Bake for Happy Kids.


and I decided to join this month


Source: Modified from Cake Bible

What you need:

4 egg yolks
125g castor sugar
58g butter
94g yuzu juice
4g yuzu zest

Method:

Whisk egg yolks with castor sugar until well combined.

Add in soften butter and yuzu juice.

On med low heat, stir mixture until thickens.  Do not boil.  Once it thickens and able to pass the wooden spoon test.  

Remove and strain into a sterlised container.

Stir in the zest and wait until it cool before capping.

Store in fridge.


Saturday, 7 June 2014

Meyer lemon curd

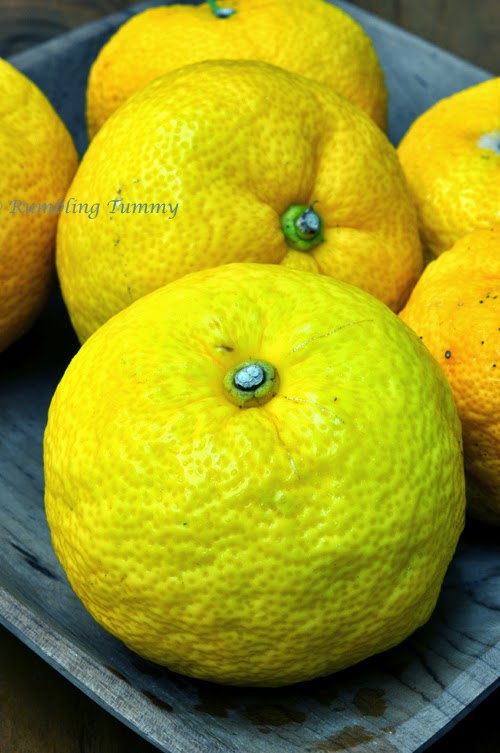
I have never tried Meyer Lemon before and I was eager to try.  I heard it is good and tasted nicer than the usual lemon, less tart.  A hybrid between lemon and orange.  Thus I seriously regretted not buying them when I was in Canada two years ago.  It was dirt cheap.

I did try looking for it in Singapore as I heard it was in season but I gave up after several trips to different supermarkets.  Just when it was forgotten, I spotted it in the supermarket while getting our milk and oats.

The lemon was tiny and cute, it has a soft smooth skin unlike the usual lemon that we used to.  When I saw the pricing, I wanted to put it back, for S$7/7 pcs, I hesitated but hubby said that since I wanted it, just buy it.

With so many activities happening of late, these babies laid in my fridge and was nearly forgotten.  Didn't want those precious to turn bad and thus, I made Meyer Lemon Curd.

This curd recipe is good as it used up the two whole egg instead of just egg yolks.

Trust me, I just couldn't stop licking my spoon.  It was soooo good!  

Now I will see what I can pair this yummilious curd with soon.


Source: No Recipe.

What you need:

113g unsalted butter
153g sugar
3 Meyer lemons, zested
130g Meyer lemon juice
2 extra large eggs, separated

Method:

Place butter into a heavy bottomed saucepan over low heat and let it melt. Once it’s mostly melted turn off the heat.

In a medium bowl, add the sugar, lemon zest, lemon juice, and egg whites. Use an egg beater or whisk to thoroughly combine the ingredients.

Once the butter becomes lukewarm temperature, add the egg yolks and whisk the butter and egg yolks together until the mixture has emulsified and is uniform in color.

Use a fine mesh sieve to strain the lemon juice mixture into the butter mixture, pressing on the solids to extract the flavor from the lemon zest.

Stir to combine, then turn the stove on to low heat.  Heat the mixture continuously stirring with a silicone spatula to keep the curd from scorching to the bottom of the pot.

The curd is done when it's reached the consistency of gravy and coats the spatula. It will be about 80ºC.

Chill the pot in a cold water bath, the curd should get thicker as it chills.  

Transfer the lemon curd to an airtight container. The lemon curd will last for 2 weeks in the fridge.


This post is also linked to the event, Little Thumbs up organised by Doreen from my little favourite DIY and me, Bake for Happy Kids, hosted by Jozelyn from Spice Up My Kitchen at this post.

Tuesday, 4 March 2014

Rhubarb and Strawberry Jam

Hubby brought home some Rhubarb for me.  I seriously don't really know how to eat it as the last time I had a rhubarb pie, its sure didn't impressed me.  Yet I was really curious to churn out something from that and see whether it will be better than from my experience.  

Did a check on the web and realized that it taste good if I paired it with strawberry.  Luckily Korean Strawberries are in season.  These days, I opt for Korean's rather than from the States as it is sweeter than the latter.  

Totally worth the try as I have gotten very good review for this.  Even my little one who doesn't really fancy jam takes to it.


Cheerios

Monday, 21 October 2013

Kaya

I love homemade kaya and I have not been making them ever since I have my kids.  Geesh, this is a very long time ago. 

Well, partly because I was seriously intimated by the long hours of stirring during my last attempt that I swear it wasn’t worth the effort. 

After finding out that I won’t burnt my kaya if I don’t give my 100% to watch over it and yet I can move around and do other household chores.   I am definitely sold on this idea.

Come to think about it, my kids never really tasted this jam!  With the urge to introduce new food to my kiddos, I decided to make again. 

Now do you like my creamy fuss free kaya?  My little wasn’t satisfied with I gave her a small piece to try.  She wanted a full serving on the second round.

For me, yes I am very happy with the outcome and am definitely looking forward to cooking the next batch.


Now I just need to swing by to Whampoa to get some authentic white bread to go with it. 


What you need:

4 eggs (65g)

100g sugar
60g gula melaka
250g thick coconut milk
5 pandan leaves


Method:


Over a double boiler, whisk eggs and sugar until dissolved.


Add coconut milk into egg mixture and whisk till combined.  Sieved.


Cook the egg mixture until it has thickened, stirring occassionally for 1 hours over slow heat.


Remove from double boiler and cool thoroughly.


Keep it chilled in fridge for up to 2 weeks.


Serve with a slab of butter on a toasted white bread.


Note: If you like smooth texture, give it a whiz in the blender.

Wednesday, 14 August 2013

Mom's sweet bean paste

In my opinion, every household should have a jar of their favourite sauce and I am definitely not talking about oyster sauce!  Especially more for those who doesn't have much time to prepare and yet wanted something home cooked.

Whenever my jar of sweet bean pasts is low, I will never leave it empty for too long.  For me, I think every kitchen should have one jar of this.  I remembered those days when I ran out of idea on what to cook.  This jar of Mommy's sweet bean paste will be my saviour.  

The only thing is it takes a fair bit of time to fry, thus I usually make about two bottles and it will last me a long time.  

It is great on all types of meat, I even tried it on fish and pumpkin and they were delicious.  You can stir fry dry or even create a sauce out of it.

For today, I have done a stir fry pork with sweet bean paste and it goes really well with a bowl of rice!


What you need 

620g preserved soya bean (grinded)
250g minced onion
125g minced garlic
200ml peanut oil

Method 

Heat oil, add onion and fry till fragrant.

Add in garlic and fry till fragrant.

Add in soya beans.

Keep stir frying it till it becomes fragrant.

Add in sugar to taste (depending on your preference, a guide is to even out the saltishness of the soya bean, stir once a while.

Cooked till bean sauce becomes dark brown.  Remove.

Cool and store in the fridge.


Hope you will enjoy it as well.

Tuesday, 9 July 2013

Rempah Udang Chilli

I am planning to make Chwee Kueh.  Bought a bag of dried shrimp and was due to find a good sambal chilli to go with it till I saw Kokken's post on a Rempah Udang Chilli.  What a perfect timing!

I took Kokken's advice by being patient when I was cooking the rempah.  I took about 45 mins to get it to brown nicely.

Thanks for sharing this wonderful recipe!


What you need:

15g dried red chillies, cut into pieces, removed seeds and softened in hot water
50g large red chillies, deseed. Cut into pieces
60g garlic, remove skin
160g small red onions (shallots), remove skin
60g dried shrimps, soaked and drained
240ml Oil

Method:

Pound dried shrimps finely and dry fry in a wok (no oil) until semi dry. Set aside.

Grind vegetable together to form a fine paste – dried chilies, large red chilies, garlic, onions. (always add in the wettest ingredient i.e. the onions here last)

Fry grinded ingredients in a wok with the 240ml oil over medium or low heat until reddish brown and aromatic.

Add the dried shrimps and fry until deep reddish brown and intensely aromatic. Add ¾ tsp salt (or to taste).

Cool and store in an air tight jar in the refrigerator.


Enjoy your week.

Thursday, 4 July 2013

Roselle Jam

During my illness, my roselle plants died on me.  I was very sad because it provided a good supply of Roselle drinks that my son loves.

So after I got better, hubby accompanied me to the nursery and we bought two pots back.  Now it is time to harvest these babies.

After making the drink, I used the fruit to make into jam.  Nothing is wasted.


I am now getting the hang of deseeding Roselle too.  


So in love with these vibrant red!

What you need:

500g fresh roselle
200g sugar (to taste)
2 cup water
½ cup water

Method:

Rinse roselle and deseed.

Put 2 cup of water and roselle petals in a pot and bring to a boil.  Approx 5 mins till petal is softened.  Strain and pour the water back into the pot.  Add honey or sugar and stir till sugar melted.  Serve as drinks.

Pour the other ½ cup of water with the soften petals in a blender and blend.  If you like some bites, just a quick pulse.  Alternatively you can chop then finely.

Put the “puree” roselle and sugar into a pot and bring to a boil. (you can taste and add sugar accordingly).   Lower heat and simmer till the puree become jam like.  Keep stirring to avoid burnt. 

Store jam in sterlised glass jar and chill in fridge once cooled.


XXOO

Monday, 25 February 2013

Mandarin Orange Marmalade

We used to buy a big carton of mandarin oranges each year till I felt so bad throwing them away at the end of the 15 days celebration.  Thus for the past few years, I will seek out the smallest packaging.  

According to Chinese, eating too much Mandarin Orange is bad for you.  To my knowledge, it is a heaty fruit that you can't eat too much as you tend to get a sore throat after.  

A few years ago, a doctor-client advise me to wash the oranges before eating.  The reason being is that the oranges are coated with a layer of pesticide and we generally just peel the skin with our bare hands and eat the fruits, unknowingly transfer the chemical into our mouth.

Ever since then, I washed all my Mandarin oranges!  So far, I noticed a change.  You might want to give this a try next year.

Anyway, as usual, I ended up with more oranges than I gave out.  Don't ask me why.  Since today is the last day of Lunar New Year, I think I better start finishing it up before they hit the bin.

I decided to turn them into Mandarin Orange Marmalade instead.  

Over in the cyber world, recipes found are more or less the same.  So here is my random pick.