Showing posts with label Jelly 果冻/Pudding 布丁. Show all posts

Monday, 25 May 2020

Crème caramel

Circuit Breaker Day 49

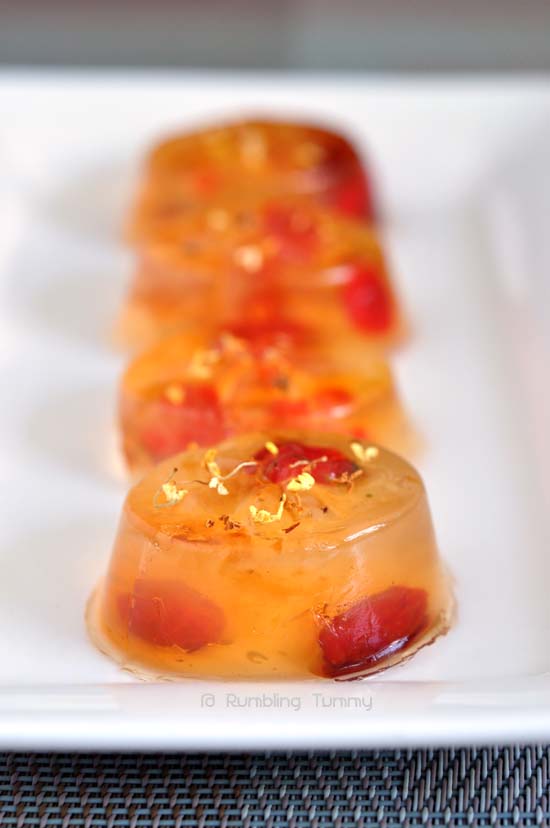
Crème caramel or Leche flan or Caramel Flan are all the same.  When I just got married and living on our own, I used to make this very often for myself especially when hubby was out of town.  To satisfy my sweet tooth and as a snack as I can chill the rest and eat one a day.  

Years later, I was taught how to prepare Leche flan using condensed milk which I find it way too sweet.

Now, I wanted to try another method of making it.  A toy that I acquired after I saw how my sister in law uses it practically for every meal and that is the Instant Pot.


Learning experience: 

The texture is a little firm but other than that, this is really good.  Making it in such a short time saves electricity and gas too.  Besides requires a little more time to make the caramel sauce, other than that, it is pretty much effortless.


What you need:
yield: 6 portions

Caramel Syrup
100g castor sugar
2 tbsp cold water

Flan
1 cup fresh milk
1 cup whipping cream (35% fat)
50g castor sugar
2 tsp vanilla extract
a pinch salt
3 eggs, lightly beaten

Method:

Make Caramel Syrup: 

Over medium-high heat, melt sugar in cold water in a saucepan. Swirl occasionally until dark golden brown.

Divide the caramel into the 6 ramekins. Then, allow the caramel syrup to cool.

Make flan: 

Heat up milk and whipping cream in a medium pot. 

Add in sugar, vanilla extract and a pinch of salt to the hot milk/cream mixture, then stir until the sugar fully dissolves.

Beat eggs lightly in a medium bowl.  Pour in the hot cream mixture slowly while whisking.  Little by little. Continue to whisk and pour the remaining milk mixture into the eggs.

Sieve through the mixture.

Pour into the ramekin and cover with aluminium foil tightly.

Add 1 cup cold water into the Instant Pot.

Place steamer rack in Instant Pot and arrange the covered ramekins on the rack. 

Pressure cook at High Pressure for 9 minutes + Natural Release. Open the lid carefully.

Remove ramekins and set aside to cool.

Chill overnight.

Run a knife around the ramekins and invert onto a plate.

Serve cold.


Enjoy!

Saturday, 15 December 2018

Christmas Jelly Cake

Last year, just before Christmas, my mom had a bad fall and I really had no mood to do anything fancy. 

I remembered I brought this cake to a gathering and had received a good review on this Christmas Jelly Cake.  Though the process is long, this recipe gives you time to do things in between.

Though the steps seem never-ending but it is not as intimidating as you think.  In fact, it is rather easy.

I did a few tries and had improved on the texture to our preference as well as the brand of milk we used.


What you need:

Biscuit base:

200g digestive biscuit
80g unsalted butter, melted 

1st layer

2½ tsp gelatine powder
¼ cup water
200g condensed milk (milkmaid)
200g water
1 tbsp lemon juice

2nd layer

1 jelly crystal (green)
1 tsp gelatine powder
200g boiling water
150g cold water

3rd layer

2½ tsp gelatine powder
¼ cup water

200g condensed milk (milkmaid)
200g water
1 tbs lemon juice

4th layer

1 packet jelly crystal (red)
1 tsp gelatine powder
200g boiling water

150g cold water

Method:

Base
Lined a springform pan with cling wrap.  Extend all the way to the top and overhanging.  Set aside. 

Blend biscuits in a food processor until fine. 

Add the melted butter and mix until well combined.

Firmly press the mixture into the bottom of the prepared tin and then place it into the fridge to set.


1st layer – milk

In a small cup, combine gelatine with water and let it sit until it bloom.

In a pot of boiling water, set the gelatine over it and stir to dissolve completely.

In another pot, combined condensed milk and water.  On low heat, stir condense milk and water until it is fully combined.

Remove heat and add in lemon juice.

Add in dissolved gelatine and stir to fully combined.

Pour the mixture over the prepared base and chill until set

2nd layer - green

In a small pot bring a 1 cup of water to boil, stir in the green jelly crystal and gelatine until dissolved. 

Add in 100ml cold water and stir.

Slowly pour into the 1st milk layer and chill until set.

3rd layer  - milk

In a small cup, combine gelatine with water and let it sit until it bloom.

In a pot of boiling water, set the gelatine over it and stir to dissolve completely.

In another pot, combined condensed milk and water.  On low heat, stir condensed milk and water until it is fully combined.

Remove heat and add in lemon juice.

Add in dissolved gelatine and stir to fully combined.

Pour the mixture over the prepared base and chill until set

4th layer – red

In a small pot bring a 1 cup of water to boil, stir in the red jelly crystal and gelatine until dissolved. 

Add in 100ml cold water and stir.

Slowly pour into the 1st milk layer and chill until set.


Let it set completely – prefer 8 hours before serving.


Enjoy!

Thursday, 6 September 2018

Mango Yoghurt Jelly Cake 芒果乳酸燕菜蛋糕

I am always amazed by all those pretty agar agar cakes and 3D jelly cakes.  Though I wanted to dabble my hand into it but I just lack that patience.  The one and only one I attempted was this Cathedral Jelly (Broken Glass Jelly) and it definitely needed lots of patience and time for it.

So since today is a quiet afternoon with most house chores done, I shall have some fun with this Mango Yogurt Jelly Cake 芒果乳酸燕菜蛋糕 .


Learning experience: 

I think because of the mango puree, the jelly has a hint of sour and my hub likes it.  What I failed is that some of the pieces, I did not "scratch" the layers well enough so it fell off after cutting.

I also realised that my fridge is not really level so the layers are not even.

Texture wise, personal preference is that I like mine a little more firm but the hub is fine with it.

Thanks for sharing this recipe, I had fun doing it.

What you need:

Mango layer (yellow)

700ml Mango yogurt drink
200ml water
10g agar agar powder
1 tsp jelly powder
120g sugar
100g mango puree

Milk layer (white)

300ml milk
200ml water
5g agar agar powder
50g sugar

Clear layer

7g agar agar powder
1 tsp jelly powder
300ml logan water (from 1 can)
300ml water
50g sugar
3 pcs pandan leaves

Fruit of your choice, diced small.

Method:

Prepare an 8” square mould.

Combine all ingredient from mango layer except mango puree into a bowl.  Stir to mix well.  Bring to a boil and lower to low heat.

Pour in mango puree and bring to a boil.  Remove from heat.

Pour ½ of the mango agar solution into the mould and let it set to semi-hard.

Combine all ingredient from milk layer into a pot, mix well and bring to a boil.

Pour ½ into the semi-set mango layer.  Let it set to semi-hard.

Combine all ingredients from clear layer and bring to a boil. 

Pour ½ of the clear agar mixture into the semi-set milk layer.

Scatter diced fruits evenly.

Pour in the remaining clear agar mixture onto the fruits.  Let it set.

Pour in the remaining milk agar mixture onto the set agar mixture.  Let it set.

Lastly pour in the remaining mango agar mixture onto the milk layer.  Let it set.

Chill in the fridge until it solidifies before cut and serves.


Enjoy!

Thursday, 16 August 2018

Aiyu Jelly (愛玉)

When I was younger, I used to enjoy a bowl of jelly with lime.  It was until I read that many of those that sell are not really jelly.  It has already been mixed with some artificial elements to it.  So I stopped eating.

Then I found out that this jelly was made from Aiyu seeds (from dried fig fruit) prominently available in Taiwan (I guess it will also be available in China).

I also chanced upon a video on how they harvest this Aiyu.  Pretty amazing.

Anyway, washing Aiyu looks tedious but recently I found out that using the Thermomix saved me a lot of trouble.

Today, I shall attempt Aiyu Jelly (愛玉) via the machine.

Thanks SSL for sharing your method.


Learning experience: 

I have attempted based on 40g seeds to 1200ml water but it could not solidify.  Not sure whether it is because I used alkaline water.   So dumped the whole batch and rework on the quantity as well as just using filtered water.  This time, it did set.

If you don't have the machine, just add the seeds into a muslin bag and rub until the water feels a little slime.  (The rubbing method should be like you are washing clothes by hand).

What you need:

50g aiyu seeds
1000ml water, boiled and cooled (or you can use mineral water)

Honey
Lime

Method:

Sift the seeds.

Combine aiyu seeds with water in the TM bowl.

Wash for 9 mins/Sp 4.

Sieve immediately into the mould.

Leave to set at room temperature for 1/2 hour before chilling.

Serve with lime and honey.


Enjoy!


Monday, 16 April 2018

Peach Gum Jelly

Hub was told to consume more collagen food so we have been diligently eating peach gum.  Kind of getting stale with the usual combination so this time round, I turned them into Peach Gum Jelly for a change.

This is good especially the weather has been getting really hot.


What you need:

Peach gum, soak and steam for 1/2 hour
600g water
1 packet of agar agar powder
a handful of goji berries
100g sugar (to taste)

Method:

Combine agar agar powder with sugar.  Mix well.

Combine goji and water and bring to a boil.

Stir in agar agar mixture and boil until dissolved.

Stir in peach gum.

Rinse the mould with water.

Pour in agar agar mixture and let it set.

Chill in fridge until firm.

Sprinkle a little osmanthus flower and serve cold.


Enjoy!

Tuesday, 19 April 2016

Avocado Chocolate Pudding

I have been seeing abundant of avocado in the supermarket.  Can't resist to make these into a simple and yet delicious Avocado Chocolate Pudding dessert for the family.

This was posted until down as I was busy during the FHA and shortly after caught the flu bug.


What you need:

3 ripe avocado, seed and skin removed
1 tsp vanilla
85g honey
25g cocoa powder

sea salt

Method:

Add all ingredients into a blender and blitz until smooth.

Scoop into serving cup and let it chill.

Sprinkle sea salt before serving.

Wednesday, 24 June 2015

Attap Chee with Grass Jelly

Whenever I have ice kachang, one of my favourite ingredient will be Attap Chee 亞答子.  I love mine hard but I do know friends that prefer softer version.  Attap Chee came from Nypa palm and it is basically tasteless if not treated.

During my recent trip, I spotted huge attap chee 亞答子 and bought home some.  These are not like those available here.  Thus I need to prepare it and cook it before eating.

This Attap Chee with Grass Jelly is usually my quick fix to counter the heatiness especially it is so humid of late.


How to treat fresh attap chee

Fresh Attap Chee
Rice water
a few lime leaves (shred)
sugar (adjust to your liking)
water enough to cover attap chee

Method:

Wash attap chee with rice water.

Rinse and repeat one more time.  

Drain.

Add in lime leaves, sugar and water to attap chee and bring to boil.

Simmer for 10 mins.

Remove from heat and let it cool.

Store inside fridge.


Cheers!

Thursday, 4 June 2015

Beer Jelly

How often do you bookmarked a recipe and never really gotten into making it?  For me, I am a big culprit on that.  I have so many that I bookmarked and wanted to do but never really gotten into it.  So right now, I am making attempt to clear it slowly.

When I first saw Beer Jelly on Ochikeron's you tube channel, I find it really cute.  Not that I like beer that much but having to serve it on the dining table will throw my kids off guard. 

Then again, whenever I buy the apple juice, it always disappeared fast.  So for this supererogatory effort to hide the juice, I finally manage to make this.


Finding: Aren't they cute?  I wish I have tiny beer mug to serve this. 

Source: Ochikeron

What you need:

500ml clear apple juice (at room temperature)
10g gelatin powder

Method:

From the 500ml apple juice, remove 43g of apple juice into a large microwavable bowl.

Mix in the gelatin powder until combined.  Cover with microwave cling wrap and microwave it for 30 sec and mix well again.

Add the rest of the apple juice and place the bowl over another bowl of ice water.

Whisk slowly for 6 minutes.  The mixture should reached around 18°C.

Remove the apple juice mixture from the ice water and then whisk quickly for 15 seconds to create more foam.

Pour into serving glasses, scoop more foam onto it.

Let it set in the fridge for about an hour.


Maybe it is too early to serve beer especially on a weekday?  


Cheers!

Monday, 25 May 2015

Italian Fruit Pudding 意大利水果布丁 (agar agar)

Ever since GL introduced you tube to me 3 years ago, I am now a die hard fan   (Yes I am a very late bloomer).  I have learnt so much from all these generous you-tubers.  Thank you for sharing your knowledge and passion.

The other day, I grabbed a few punnets of fruits and initially plan for fruit tart but now I decided to change plan and make this Italian Fruit Pudding 意大利水果布丁 that I saw on a you-tube channel.

It is so pretty and definitely will look nice on the dinner table.

Oh, btw I don't know how or why it is named so.  I had done a brief check and draw blanks.

If you know why, please enlighten me.


Finding: My first batch I used 10g of gelatine as stated in Tinrry's site but unfortunately mine didn't set well.

Thus for my second attempt, I had replaced it with agar agar powder.  Thus it didn't give a clear jelly appearance.

I will try again soon using gelatine powder.

Inspired: Tinrry
  
What you need:

Fruits of your choice.
1 tbsp castor sugar
1 tbsp rum

900ml water
a sprig of peppermint leave
1 packet of agar agar)
100g sugar

Fruits: kiwi, raspberry, blueberry, orange, mango

Method:

Cut fruits into bite size.

Place cut fruits on a big plate.

Sprinkle castor sugar (1 tbsp) over fruits.   

Follow by rum and mixed fruits and sugar.   Set aside.

Mix gelatine powder with sugar and stir well to combine.

In a pot, bring water and peppermint leave to a boil.

Remove peppermint leaves.

Stir in gelatine powder mixture.  Mix until gelatine dissolved and turned clear.

Scoop fruits onto serving cup.  (do not add in the syrup).  Filled about 1/3 of the serving cup.

Once gelatine mixture is cool slightly, add into fruits.  (Do not add boiling gelatine mixture as it will cook the fruits).  It should fill about half of the cup.  Swirl a little to ensure gelatine coat fruits.

Fill more fruits.

Chill in fridge.

Serve cold.


I'm submitting this post to the Best Recipes for Everyone May 2015 Event (Theme: My Favourite Desserts) organized by Fion of XuanHom'sMom and co-hosted by Aunty Young


Happy Monday!


Saturday, 9 May 2015

Mango Chia Seed Pudding

Once I attended a cooking workshop that uses Alkaline water to make a similar dessert and it was delicious.  For her, she incorporated bananas and blueberries. 

Since I have a packet of chai seeds at home, I decided to change this version using milk instead of water, just like the Overnight Oats recipe.

This is totally healthy and delicious, Mango Chia Seed Pudding.

Try it.


What you need:

1¾ cup fresh milk
8 tbsp chia seeds
6 tbsp honey (adjust according to your preference)
fresh mango, diced and chilled

Method:

In a bowl, combine milk, chia seeds and honey. Give is a good whisk.

Let the mixture sit for about awhile to fully absorb in the liquid.  Give it another good stir to blend further.

Cover and refrigerate for at least 3 hours or overnight.

Remove the bowl with the pudding from the fridge.

Scoop some pudding into the bottom the serving glasses. Layer some diced fresh mango on top of the pudding layer. Alternate layers of chia pudding and freshly diced mango until glasses are filled to the top, ending with freshly diced mango.


Serve immediately or keep in the fridge until ready to serve.


I'm submitting this post to the Best Recipes for Everyone May 2015 Event (Theme: My Favourite Desserts) organized by Fion of XuanHom'sMom and co-hosted by Aunty Young


Have a good weekend! 

Happy Mother's Day!

Wednesday, 6 May 2015

Corn pudding

I had a can of Cream of corn that was sitting in my kitchen counter.  I didn't know what to do with it and I just kept it back into my pantry after a week of hesitation.

Then in the evening, my long time friend, A whatsapp me a picture.  She was delighted with the result of this recipe and shared her excitement with me.

What a perfect timing!  

After reading the recipe, I got into action right away as I have all the ingredients on hand and needed to bring something sweet to a luncheon the next day.  

Hubby was surprised that after cleaning up the kitchen and as I was about to sit down for my knitting that I was once again back into the kitchen.  I reckon that it is better to get this off my mind than the next morning.  

This is definitely a good recipe as the washing and preparation is so minimal.  This tasted really delicious, hub and I didn't even wait for it to chill before we dig in.

Thanks A for sharing this wonderful recipe.  Definitely a keeper.


Verdict: comments that I have gotten from taster is that this pudding has a good taste of corn.  I had added 1¼ cup sugar and still finds it on the sweet side after chilled.  So you might want to lower it if you don't have a sweet tooth.

What you need :

1 can of sweet corn cream style
1 can evaporated milk
1½ cup sugar or 1¼ for less sweet (lower to 1 cup for our preference)
3 cups of water
200g Custard powder
1½ tsp Vanilla extract

Method:

In a medium size pot, custard powder and sugar in a bowl.

Add in the water and stir with a whisk until custard powder dissolve into the water. 

Add in the rest of the ingredient and stir well. 

Cook the mixture on medium low heat, stirring all the time until mixture become very thicken, shiny and bubble appear on top.  (This takes a while)

Spoon the thick custard onto a tray and smooth the top. 

Chilled in fridge and serve cold.


I'm submitting this post to the Best Recipes for Everyone May 2015 Event (Theme: My Favourite Desserts) organized by Fion of XuanHom'sMom and co-hosted by Aunty Young


Keep safe.


Friday, 27 February 2015

Osmanthus and wolfberries Konnyaku Jelly

It is very good to feed wolfberries to kids and even to adults.  You can just packed it into a small container and let the kiddo nibble on it as snack.  Much better than giving candy.

Wolfberries are extremely good for eyes.  Perhaps if kids take more of this, myopia might not be so common especially we are always on gadgets.

I love Osmanthus too as it has such a gentle flora smell to it.

During Lunar New Year, making Osmanthus and wolfberries Konnyaku Jelly seems  pular as it symbolise 年年有鱼 (meaning: abundance)

So this is just perfect for a get together during this period for family and friends.


I just realised how hideous my fishes look.  Next time I will find small wolfberries.

What you need:

1 packet of konnyaku jelly powder 
200g sugar
900ml water (as I prefer a firmer texture)
4 tsp dried osmanthus flowers
4 tbsp wolfberries soaked in water until puffy; drained

Method:

Mix konnyaku jelly powder with sugar.  Set aside.

In a pot, add water and bring to a boil. 

Lower heat and add osmanthus flowers. Simmer for about 3 minutes.

Add konnyaku jelly powder. Stir until the powder is fully dissolved. Turn off heat.

Rinse jelly mould and pour the jelly mixture onto a jelly mould. 

Add wolfberries.

Let the jelly cool down a bit in room temperature and chill in fridge until the jelly is set.


Cheers!


Saturday, 13 September 2014

Cathedral Jelly (Broken Glass Jelly)

I have bookmarked this for the longest time but never gotten into it and now I finally put my act together to try this.

From you tube, this looks so pretty, definitely reminded of the cathedral that was in my school when young.  

I didn't managed to get contrast flavour, I had to run to two supermarkets before I was able to assemble this.

Next time, I make sure I will buy the pineapple or mango flavour to give it a brighter feel.


Findings: 5 boxes of jelly was a little way too much.  I will reduce it to 4 and I think it will look better.  We like the texture of the jelly to be firm.  This proportion yield a gummy bear texture which we like very much.

What you need:

5 boxes of Totally Jelly (assorted flavour)
200g boiling water (for each box)
1 tsp of gelatine (for each box)

Method:

In a bowl, pour the Totally jelly and 1 tsp of gelatine together.  Mix well.

Add in the boiling water, let it sit for 1 min.

Stir until everything dissolved.  

Pour into container and let it cool.

Chill until further use.


Cream Jelly

What you need:


1 tbsp gelatine powder
¼ cup cold water
1¾ boiling water
1 can of condensed milk

Method:


Mix gelatine with the cold water and let it sit for 5 mins.  Stir to combine.


Add in boiling water and stir until gelatine dissolved.

Add in condensed milk and mix until even.
  
Set aside to cool.


To assemble

Cut jelly into cubes.  Mix the different colours and distribute them evenly around the jelly mould.

Pour cool milk jelly over it.

Chill until set.

Serve cold.

Saturday, 12 July 2014

Baked Durian Tapioca Custard 焗西米布丁

We enjoyed dessert after a meal very much and I tried to give variety as much as possible to the family.  

Since I wanted to use up the evaporated milk and to clear off some durian puree that was leftover from my durian ice cream.  

I decided to prepared Baked Durian Tapioca Custard 焗西米布丁.


Let's hope my two kids will enjoy this dessert which is their first time eating.

What you need:

100g sago  
20g corn flour
20g custard powder
60g sugar
100ml evaporated milk
200ml coconut milk
150ml water 
1 egg, beaten

durian puree

Method:

Bring a pot of water to a brisk boil.  Add in sago and cook for 10 mins.  Turn off heat and let it sit in the hot water for another 10 mins.

Drain under running water and set aside.

Mix corn flour, custard powder, sugar, evaporated milk, coconut milk and water in a pot.

Turn on heat and stir until it started to thicken a little, add in sago.  Stir to combine well and mixture started to thicken.

Turn off heat and add in beaten egg, stirring continuously until well combined.

Scoop mixture into a ramekin bowl and baked at 200°C for 15 - 20 mins.

For air fryer, please bake on 12 - 15 mins.

Serve hot or warm.


Happy Weekend!

Monday, 23 June 2014

Nutella Rice Pudding

I am "going" on a picnic and I'm bringing Nutella Rice Pudding that begins with the letter N.


Louise, the author from Months of Edible Celebrations, introduced this on-line picnic called, The Picnic Game, and she is hosting each June, with the final round-up on 1st July. 

June 18th is International Picnic Day and Louise has invited us for a picnic game from 18th to 28th June. And for the first time, I'm "going" on a The Picnic Game with Louise and all the lovely ladies who has joined in the fun.  

The game is played by selecting a letter and you are supposed to make some food beginning from your chosen letter, to the picnic. The chosen letter will be confirmed and assigned to each person by Louise, like in my case, I chose the letter N, and it is for Nutella Rice Pudding. 

Each of us must list what the other persons before your letter are bringing! It is a fun on-line picnic game!

For more details head over to Louise's blog for more details.


Z - Zucchini Cake - double chocolate cake

***********************************

I have some Arborio rice left from making risotto.  Not enough for another round of risotto so I used the remaining rice to make Nutella Rice Pudding.


Personally I have never eaten a rice pudding so I am curious.  Nutella is my son's favorite and you will be appalled to see how much he slapped onto this bread.

This is very easy to put together, actually it is a bad idea to make something chocolaty during this period but my kiddos' body system are better than mine, they are able to take "heaty" food in this HOT climate.As for me, I just take a tiny weeny portion just to satisfy my curiosity.


What you need:

½ cup of Arborio rice
1 cups milk
½ tsp vanilla bean paste
1/8 cup castor sugar


100g Nutella

Method:

Heat milk on medium heat, add in castor sugar.  Stir until sugar dissolved and a rolling boil.

Add in vanilla bean paste.  Mix well.

Add in Arborio rice and cook until 15 - 20 min.  Keep stirring to prevent burning.  

Add in Nutella and stir until combined.

Scoop into serving cup and add a scoop of nutella onto it (optional).


Enjoy!